目录:

1.我被黑了吗?
继续之前,我们先尝试回答以下问题:
有主机下载了EXE/ELF(可执行文件)? --> YES --> 木马?嗯哼?下载的EXE/ELF运行了吗?电脑被黑了??Beaconing???2.HIDS --> Rootkit?em...有点意思
行业角度:主机层面的威胁感知已经从传统的HIDS发展为主机自适应安全(Gartern)
技术角度:目前主流的实现有:Wazuh、osquery、perf/eBPF、Grsecurity/PaX等,不一一罗列
3.NIDS --> 加密流量。。。呵呵呵
迅猛增长的加密流量正不断改变着威胁形势。随着越来越多的企业实现全数字化,大量的服务和应用都采用加密技术作为确保信息安全的首要方法。更具体地说,加密流量同比增长已超过 90%,对流量进行加密的网站数量已从 2015 年的 21% 上升到 2016 年的超过 40%。据 Gartner 预测,到2019 年,80% 的网站流量都会被加密。
遗憾的是目前主流的NIDS系统无法直接检测加密流量。当然对于加密流量也不是没有办法,这里先透露一下,后续我们会有专门的文章进行探讨。
# 应对加密流量的几种方式:
1.ssl proxy 硬件/软件
2.放在(IDS)负载均衡器后面
3.客户端安装Root证书
4.ja3
5.Cisco Encrypted Traffic Analytics
6.NIDS + HIDS 关联
4.NIDS进化 --> NSM网络安全监控

做入侵检测的朋友们应该非常熟悉这样的Alert(警报),让人抓狂的警报。。。,从警报上我们只能知道主机:192.168.8.11可能从外部主机:183.47.221.72下载了PE EXE(可执行文件),无法确认是否误报也无法确认该文件是否是木马程序。
进入NSM
5.NSM,看起来真有问题啊,谁干的???
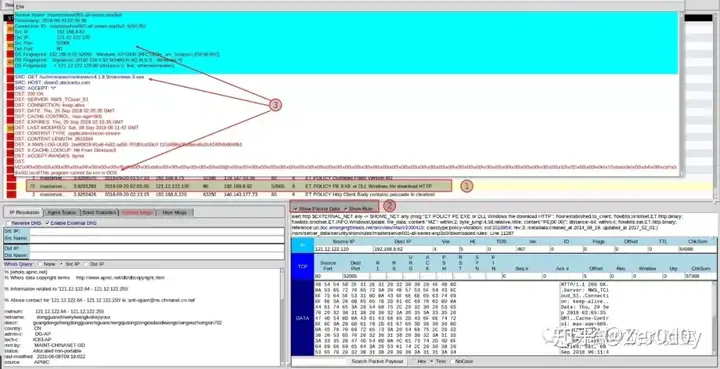
我们再来看看这个图(NSM网络安全监控系统)
图中有几个关键信息:
➀.系统检测到主机下载了可执行文件
➁.查看对应的入侵检测规则和Payload数据
➂.查看会话数据(Bro)及全包捕捉数据
➃.通过与VT和Cuckoo或其他沙盒关联,至此我们可以检测90%的可疑程序,但是无法100%检测(无法拿到主机数据)
进入威胁感知平台
6.威胁感知平台 -- 顺应时代而生?) --> 看我揭开你神秘的面纱
6.1 网络层和主机层关联原理与实现
网络层和主机层关联有多种实现方式,我们今天主要介绍Bro + osquery的方式,我们会在后续的文章中介绍其他方式。
6.1.1 技术栈:Bro + osquery
6.1.1.1 Bro Network Security Monitor简介
这里直接引用Bro团队官方的解释:
a) It transforms raw network traffic into detailed network logs, organized by protocol
# 这也是Bro的迷人之处,内部拥有无穷无尽的Data
b) It’s a programmable platform that can be used to automate traffic analysis tasks via scripts.
6.1.1.2 osquery简介
一句话,osquery正在成为新的HIDS标准。(github上超过1w星,很多安全初创企业也是基于osquery,如Uptycs,Kolide)
6.1.1.3 关联原理与实现
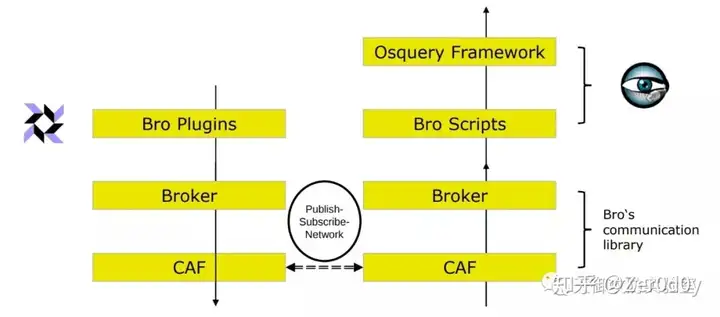
1.架构图
主要分为两部分组成:
a) Bro Controller(Bro + osquery Framwork(Bro脚本))
b) osquery Sensor(osquery + plugin)
c) Bro Controller和osquery Sensor使用Broker进行数据交换
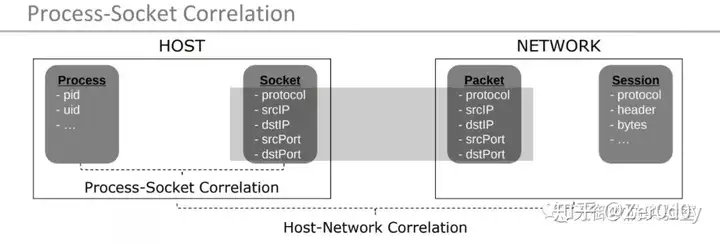
2.进程和Socket关联,主机和网络关联
a) 进程和Socket关联:基于Linux内核audit,使用osquery的process_events和socket_events表进行关联
b) 主机和网络关联:取socket_events表中的五元组数据和Bro Controller conn.log五元组数据进行关联
6.2 实战
6.2.1 可见、感知 --> 猎杀
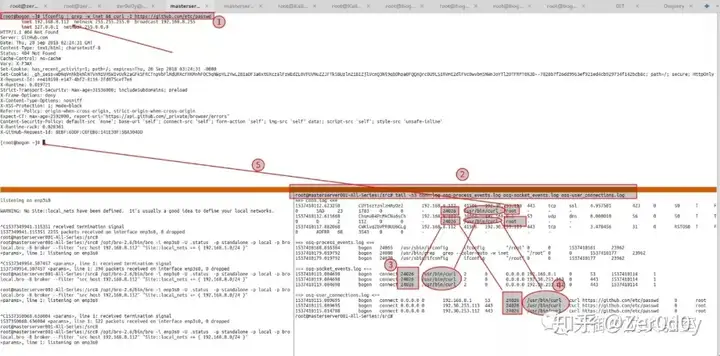
1.在网络层看到的流量可以定位到由哪台主机、哪个用户、哪个进程发起的网络连接。
2.网络层拥有主机层完整的资产信息(系统、进程、网络连接等),同时可以实时查询主机层的资产信息。
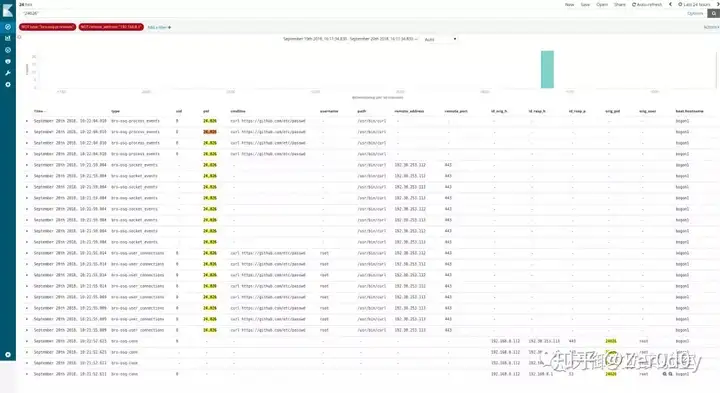
6.2.2 部署脚本
# 注意:本项目仍处于测试阶段!
# 1.Bro Controller
## 1.1 安装Bro(git版)和osquery Framwork
#!/bin/bash
set -e
# Any subsequent(*) commands which fail will cause the shell script to exit immediately
# 如果sha256sum检查失败,脚本退出
# 记录脚本行为(排错目的),sh -x $0
exec 3>&1 4>&2
trap exec 2>&4 1>&3 0 1 2 3
exec 1>log.out 2>&1
# Ubuntu 16.04
# 安装依赖软件包
apt-get -y install cmake make gcc g++ flex bison libpcap-dev libssl-dev python-dev swig zlib1g-dev
# 1.Install Bro From Git Source
git clone --recursive git://http://git.bro.org/brocd bro
./configure --prefix=/opt/bro --enable-debug
make && sudo make install
# 2.Install osquery Framwork
wget https://github.com/tianyulab/Threat_Hunting_with_ELK/raw/master/Bro_osquery/tianyulab.osquery.tar.gzwget https://github.com/tianyulab/Threat_Hunting_with_ELK/raw/master/Bro_osquery/tianyulab.osquery.tar.gz.sha256sumsha256sum -c tianyulab.osquery.tar.gz.sha256sum
tar xf tianyulab.osquery.tar.gz
cp -a osquery /opt/bro/share/bro/site/
# 3.Run Bro
echo "@load osquery" >> /opt/bro/share/bro/site/local.bro
/opt/bro/bin/broctl deploy
# 4.验证
/opt/bro/bin/broctl status
netstat -tupnl | grep 9999
########################################################################################
# 2.安装osquery Sensor(定制版Osquery)
#!/bin/bash
set -e
# Any subsequent(*) commands which fail will cause the shell script to exit immediately
# 如果sha256sum检查失败,脚本退出
# 运行:sh -x $0 "Bro IP"
# 记录脚本行为(排错目的)
exec 3>&1 4>&2
trap exec 2>&4 1>&3 0 1 2 3
exec 1>log.out 2>&1
# Ubuntu 16.04
# 1.安装依赖软件包
sudo apt update && sudo apt-get -y install sudo make python ruby git bash curl python-pip
# 2.安装osquery Sensor
wget https://github.com/tianyulab/Threat_Hunting_with_ELK/raw/master/Bro_osquery/osquery_sensor.debwget https://github.com/tianyulab/Threat_Hunting_with_ELK/raw/master/Bro_osquery/osquery_sensor.deb.sha256sumsha256sum -c osquery_sensor.deb.sha256sum
dpkg -i osquery_sensor.deb
wget https://github.com/tianyulab/Threat_Hunting_with_ELK/raw/master/Bro_osquery/osquery.bro.example.conf-O /etc/osquery/osquery.conf
# 3.配置&启动
# export bro_ip=`ip route get 1 | awk {print $NF;exit}` # 替换为:Bro IP
export bro_ip="$1"
sudo sed -i -e /"bro_ip":/s/.*/"bro_ip": ""$bro_ip"",/ /etc/osquery/osquery.conf
sudo osqueryctl config-check
# sudo osqueryctl start
# /usr/bin/osqueryd --config_path=/etc/osquery/osquery.conf --pidfile=/var/run/osqueryd.pidfile
# systemd
sudo systemctl enable osqueryd
sudo systemctl start osqueryd
########################################################################################
# 3.配置ELK(可选项)
使用Filebeat传送日志,logstash接收
wget https://github.com/tianyulab/Threat_Hunting_with_ELK/raw/master/Bro_osquery/bro-osquery_logstash.confcp bro-osquery_logstash.conf /etc/logstash/conf.d/
wget https://github.com/tianyulab/Threat_Hunting_with_ELK/raw/master/Bro_osquery/bro_osq_filebeat.ymlcp bro_osq_filebeat.yml /etc/filebeat/filebeat.yml
# 启动顺序:logstash,filebeat
7.致谢
1.此项目原由Steffen Haas开发,国内团队如果感兴趣可直接联系
Steffen(Email:haas@informatik.uni-hamburg.de)
2.@Bro 团队
3.特别感谢Steffen Haas提供的思路和帮助!
8.更新
8.1 排错与调试
# 1.Bro
bro -B help
/opt/bro-2.6/bin/bro -i enp3s0 -U .status -p standalone -p local -p bro local.bro -B broker --filter "src host 192.168.8.112" "Site::local_nets += { 192.168.8.0/24 }"
# 2.osquery
osqueryd --disable-distributed=false --distributed_interval=0 --distributed_plugin bro --bro-ip="192.168.8.3" --logger_plugin bro --log_result_events=0 --disable_audit=0 --audit_allow_config=1 --audit_allow_sockets=1 --verbose --audit_debug
https://github.com/facebook/osquery/blob/master/docs/wiki/deployment/process-auditing.md#troubleshooting-auditing-on-linux# 3.audit
auditctl -l # lists all currently loaded Audit rules
auditctl -s # reports the status of the Audit system
auditd -f # leave the audit daemon in the foreground for debugging
## 参考:
Linux System call list
https://jlk.fjfi.cvut.cz/arch/manpages/man/syscalls.2https://jlk.fjfi.cvut.cz/arch/manpages/man/socketcall.2.en8.2 注意事项
# 1.流量镜像
需要把osquery Sensor的流量镜像到Bro Contrller,通过TAP,交换机或主机层面流量copy工具
举例:
iptables -t mangle -A PREROUTING -s 9.9.9.9/32 -j TEE --gateway 192.168.8.2
iptables -t mangle -A POSTROUTING -d 9.9.9.9/32 -j TEE --gateway 192.168.8.2
# 参考:
http://ipset.netfilter.org/iptables-extensions.man.html#lbDW9. 视频Demo
https://v.youku.com/v_show/id_XMzgzODY5MzI5Ng==.html9. 本文首发在安全脉搏
https://www.secpulse.com/archives/75782.html声明:本网页内容旨在传播知识,若有侵权等问题请及时与本网联系,我们将在第一时间删除处理。E-MAIL:704559159@qq.com